Studio Platform Features
My Pie Studio is a real-time overlay designer for streamers. This guide is a complete reference for every element type, property, and keyboard shortcut available in the editor.
Shared Element Properties #
Most visual elements (Text, Image, WebM, Timer, Ticker, iFrame) share a common set of properties in the right-hand Object Editor panel:
Position & Size #
- X, Y: Pixel coordinates on the canvas. You can also drag elements directly.
- Width, Height: Dimensions in pixels. Drag corner handles to resize; hold Shift to lock aspect ratio. Minimum size is 20×20px.
- Rotation: Degrees from 0° to 360°. Resize handles respect the current rotation angle.
- Flip H / Flip V: Mirror the element horizontally or vertically.
Appearance & Behavior #
- Opacity: Transparency from 0.0 (invisible) to 1.0 (fully visible).
- Layer Order: Use the "Bring Forward" and "Send Backward" buttons to move objects front or back.
- Locking (): Prevents dragging, resizing, and keyboard movement. Locking a folder locks all children.
- Visibility (): Hide/show on the overlay. Hiding a folder hides all its children.
Animations #
Each visual element supports separate Intro and Outro animation types (e.g., Fade, Slide) with configurable durations in milliseconds.
Border Controls #
All visual elements (Text, Image, WebM, Timer, Ticker, iFrame) support customizable borders:
- Border Width: Thickness in pixels (0 = no border).
- Border Color: Any color via the color picker.
- Border Radius: Corner rounding in pixels (0 = sharp corners, 50+ = pill shape).
Borders are applied with box-sizing: border-box, so they don't change the element's overall dimensions.
Element Types #
Text #
Static or dynamic text labels with full typography control.
- Content: Multi-line text input. The first 20 characters automatically become the layer name.
- Font Family: Choose from curated Google Fonts (Roboto, Montserrat, Pacifico, etc.).
- Font Size: Size in pixels.
- Color: Text color picker.
- Background: A colored box behind the text with a separate opacity slider (e.g.,
rgba(0,0,0,0.5)) for readability over video.
Image #
Display static or animated graphics (PNG, JPG, GIF, WebP).
- Direct Upload: Upload a local file. The system automatically compresses all images and animations for fast loading on stream without losing quality.
- Load from URL: Paste any public image URL. The editor auto-detects GIFs and sets them as animated.
- Name: A unique identifier for this image (used in the Layers panel).
- Linked Audio: Assign an Audio element to play automatically whenever this image's intro animation fires.
WebM Video #
High-quality video files with transparent backgrounds. Best for animated stickers and complex moving effects.
- Direct Upload: Upload a local
.webmfile. Free tier: up to 10 WebM files, 10 MB per file. - URL: Or paste a direct link to an external
.webmfile instead. - Loop: Toggle whether the video restarts automatically after ending.
- Name: A unique layer name.
Timer #
A live countdown to a specific date and time.
- Target Date: The specific date and time to count down to.
- End Text: Message displayed when the countdown reaches zero (default: "Time's Up!").
- Font / Color / Background: Same typography controls as Text elements.
- Show Days: Toggle to display days separately (e.g.,
3d 02:15:30instead of74:15:30). Useful for long countdowns.
Ticker (Scrolling Text) #
A running text string that continuously scrolls your message across the screen.
- Text: The scrolling content. First 20 characters become the layer name.
- Speed: Scroll speed from 10 (slow) to 500 (very fast). Default is 100.
- Direction:
left(default),right,up, ordown. - Background: Colored bar behind the ticker with independent opacity.
- Font / Color: Same typography controls as Text.
iFrame (Web Embed) #
Embed any web page directly in your overlay, chat widgets, donation panels, dashboards, etc.
- URL: The web address to embed.
- Content Width / Height: The internal document resolution (default 1920×1080). Change these to zoom in/out on the embedded page.
- Scrolling: Toggle scrollbar visibility on the iframe.
- Pan: Hold Alt + drag on the canvas to slide the internal page content within the frame.
- Zoom: Hold Alt + scroll wheel to zoom in/out on the embedded content (min scale 0.1, zoom speed 0.05).
- Manual Inputs: The editor also provides X, Y, Width, Height, Content Width, and Content Height number inputs for precise positioning.
Audio (Sound Alerts) #
Sound effects that can be triggered via webhooks or linked to visual elements. Audio has no visual representation on the canvas.
- Direct Upload: Upload a local audio file (MP3, OGG, WAV, M4A, FLAC). Free tier: up to 20 audio files, 2 MB per file.
- Audio URL: Or paste a direct link to an external audio file instead of uploading.
- Volume: From 0.0 (silent) to 1.0 (full). Default is 0.5.
- Name: Must be unique among audio elements. Used in the webhook
curlcommand. - Test Play: The "Play" button in the editor lets you preview the sound locally in your browser.
- Webhook Trigger: Fire the sound remotely via the API. See the Webhooks Guide.
Effect (Particles) #
Full-screen visual effects (snow, rain). These cover the entire screen and are displayed above other visual elements.
- Type:
snow(default),rain, orleafs. - Custom SVG: Paste your own custom design, and the system will turn it into falling particles.
- Amount: Number of particles (default 100).
- Speed: Movement speed (default 2).
- Size: Particle size (default 3).
- Direction: Fall direction:
down(default),up,left,right. - Fade Out: Percentage of height where particles begin disappearing (default 100 = no fade).
QR Code #
Display a dynamic, scannable QR code directly on your stream. Viewers can point their phone camera at the screen to instantly open a link, no need to type anything in chat.
Why use it? Sponsors often want a direct, measurable way for viewers to visit their website. A QR code on screen converts passive viewers into active visitors. Unlike chat links, QR codes work even when chat is moving fast or the viewer is watching on a TV.
How it works
- Add a QR Code element from the "Add Element" menu.
- Enter the Target URL, the page you want viewers to land on (e.g., a sponsor's promo page).
- The system automatically generates a unique tracking shortlink (e.g.,
mypie.studio/r/aB3x9Z). The QR code on screen points to this shortlink, which redirects to your target URL. - Customize the look: change colors, dot shape (square, rounded, dots), and corner style to match your brand or the sponsor's branding.
- Click Publish. The QR code appears on your live overlay.
What gets tracked
Every time a viewer scans the code, we log:
- Scan count: total and unique visitors
- Device type: mobile, tablet, or desktop
- Operating system: iOS, Android, Windows, etc.
- Browser: Chrome, Safari, Firefox, etc.
- Approximate locale: based on the viewer's browser language setting
Privacy: We never store raw IP addresses. Only a truncated hash is kept for spam prevention (1 scan per IP per minute).
Ad Campaign integration
If you place a QR Code element inside an Ad Folder, every scan is automatically counted as a click for that campaign. The sponsor sees these clicks in their public report alongside impression data, giving them a complete picture of ad performance.
Folder #
Organizational containers for grouping layers.
- Collapse/Expand: Toggle children visibility in the Layers panel.
- Lock: Locking a folder recursively locks all children.
- Visibility: Hiding a folder recursively hides all children.
- Delete: Deleting a folder deletes all contents inside it.
- Folders can be nested and dragged up/down within the Layers panel, but they cannot be visually dragged or resized directly on the canvas. Folders also cannot be triggered via webhooks.
Ad Folder (Sponsor Banners) #
Any folder can be turned into an Ad Folder by enabling the Ad Schedule toggle in the Object Editor. This unlocks automatic sponsor ad management:
- Mode: pick how the banner is displayed:
- Scheduled: shows for a set duration at a regular interval (e.g., 15s every 12min). Optional ±60s random offset.
- Always On: stays on screen the whole stream. Verified impression sampled every 5 min.
- Rotate: cycles through visible banners in the folder, one at a time. Configurable per-banner duration and gap between.
- Impression Tracking: Every time the ad shows on a live stream, My Pie records the timestamp, viewer count, category, and stream title from the Twitch API.
- Verified Data: Only impressions confirmed by Twitch with viewers > 0 are marked as verified.
- Campaign-level Share Link: Each ad folder gets a unique shareable link covering the whole campaign, no login needed for sponsors to view.
- Per-sponsor Share Links: When a folder rotates banners from different sponsors, each banner also gets its own URL. Sponsors only see their own banner's data, never each other's. Manage them in the Sponsors card on the campaign detail page.
- CSV Export: Download all impression data for invoicing or custom reports.
Put your sponsor's banners, logos, or animated WebMs inside the folder. Everything shows and hides together on the schedule (or rotates, depending on the mode).
Workspace & Workflow #
Publishing Changes #
All changes you make are only visible to you. Once your design is ready, click Publish and the system will instantly update the overlay on your live stream. The Revert button will discard any unsaved edits.
Canvas Resolution #
Click Canvas Settings in the toolbar to change resolution. Choose from presets (Desktop 16:9, Mobile 9:16) or enter custom dimensions. Use the Swap button to quickly switch between landscape and portrait. The overlay scales dynamically to fit any OBS Browser Source size.
Grid & Snapping #
Toggle the alignment grid and smart snapping from the toolbar. Snapping uses an 8px threshold and targets canvas edges, canvas center, and other objects' edges and centers.
Canvas Background #
Upload a background image or fetch your current Twitch stream thumbnail directly from the toolbar. You can also pick a solid color with the color swatch button, useful for previewing your overlay on different stream backgrounds. A button appears to clear the image or color. This is for design reference only, the background is not rendered on the OBS overlay.
Storage Quota #
The free tier includes 150 MB of total uploaded asset storage, with per-kind limits:
- Images: unlimited count, 10 MB per file (JPG, PNG, GIF, WebP, AVIF).
- Audio: up to 20 files, 2 MB per file (MP3, OGG, WAV, M4A, FLAC).
- WebM: up to 10 files, 10 MB per file.
Uploads that would push you over a limit are rejected at upload time with a clear error message. Delete unused assets from the studio to free space. URL-loaded assets (paste a public URL instead of uploading) don't count against your storage.
Keyboard Shortcuts #
Shortcuts are active when the canvas is focused (not when typing in editor fields). They do not apply to locked objects, folders, or effects.
Movement & Deletion
- ← → ↑ ↓, Move selected element by 1px.
- Shift + Arrows, Move selected element by 10px.
- Delete / Backspace, Delete the selected element (with confirmation dialog).
Modifier Keys
- Shift + corner resize: Lock aspect ratio while resizing.
- Alt + drag on an iFrame, Pan the internal web page content.
- Alt + scroll wheel on an iFrame, Zoom the embedded page content in/out.
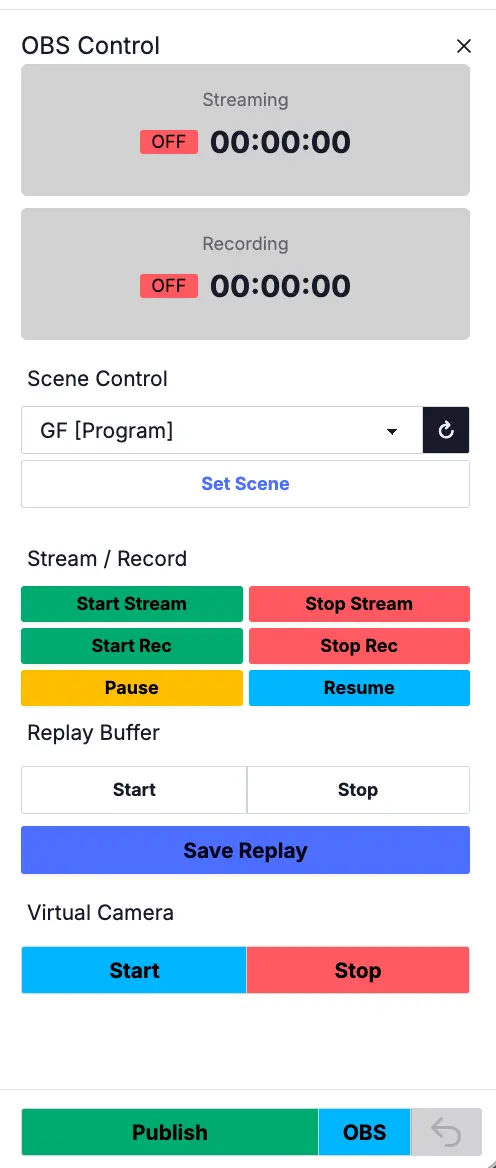
OBS Remote Control #
My Pie Studio can control your OBS directly from the web editor, switch scenes, start/stop streaming, manage recordings, and more. This works through the OBS Browser Source API: no plugins, no OBS WebSocket server needed.
Required: Page Permissions in OBS #
By default, OBS does not allow browser sources to control it. You must enable this manually:
- Open OBS → Sources panel → right-click your My Pie browser source → Properties
- Scroll down to "Page permissions" (also called "Control Access Level")
- Set it to "Advanced access" or "Full access"
- Click OK
If "Page permissions" is set to the default (no access), the OBS panel will show a " OBS Not Detected" message with a Check Again button. The studio detects the permission level automatically when the overlay connects.
Permission Levels #
No Access (Default)
The OBS panel shows a " OBS Not Detected" fallback with a Check Again button. No controls are available.
This happens when OBS Page Permissions are left at the default, or when OBS isn't running. The OBS button is still visible (if enabled in Dashboard), giving the user guidance on how to connect.
Advanced Access (Level 4)
The OBS panel shows active controls. Your team can:
- See streaming and recording status (ON/OFF + duration timer)
- View a live list of all OBS scenes
- Switch the active scene (Program)
- Switch the preview scene (in Studio Mode)
- Refresh scenes list
Cannot start/stop streaming, recording, replay buffer, virtual camera, or change transitions.
Full Access (Level 5)
Everything from Advanced, plus complete OBS control:
- Stream: Start / Stop streaming
- Recording: Start / Stop / Pause / Resume recording
- Replay Buffer: Start / Stop / Save replay
- Virtual Camera: Start / Stop virtual camera
- Transitions: Browse available transitions, set active transition, fire transition (Studio Mode)
- Studio Mode: When OBS Studio Mode is enabled, the panel automatically shows Preview Scene and Transition controls
How It Works #
The flow is entirely through your existing browser source, no extra setup:
- Your overlay (the browser source in OBS) detects
window.obsstudio, the native CEF API exposed by OBS - It reports the permission level back to the server via WebSocket
- The studio editor shows/hides controls based on that level
- When you click "Set Scene" in the editor → command goes via WebSocket → overlay executes
obsstudio.setCurrentScene()→ OBS switches
Commands travel: Studio Editor → Server (WebSocket) → OBS Browser Source → OBS CEF API → OBS
Everything happens in under 100ms on a local network.
Per-User Access Control #
As the studio owner, you control who can see OBS controls with a simple toggle:
- Go to Dashboard → Team
- Each accepted manager has an OBS toggle (green = enabled, gray = disabled)
- New managers start with OBS access disabled. You must enable it explicitly.
- When enabled, the OBS button appears in the manager's studio footer, even if OBS is not running. If OBS is offline, the panel shows a " Not Detected" message with a retry button
- When disabled, the OBS button is completely hidden and all OBS commands are blocked server-side
This gives you two independent layers of security:
- Dashboard toggle: controls who can see the OBS button (per-user)
- OBS Page Permissions: controls what actions are available (scene-only vs full control)
Critical: Add Overlay to All Scenes #
The overlay browser source is your team's only connection to OBS. If someone switches to a scene where the overlay source doesn't exist, the WebSocket disconnects and all OBS controls stop working.
Always add the My Pie overlay to every scene in OBS. You can make it the lowest layer or hide it behind other sources, the important thing is that it exists in every scene so the connection is never broken.