Ad Campaigns
Want to monetize your stream with sponsor ads? My Pie lets you schedule ad banners directly in your overlay, automatically tracking every impression using real Twitch data. Send your sponsors a real report. No spreadsheets, no guesswork.
Important to know: My Pie isn't a sponsor marketplace. You still secure your own deals. Instead, we provide a reliable way to deliver on the deals you've made. Set up the ad, let us track every impression with verified Twitch data, and share a transparent report your sponsors can trust.
Full walkthrough: creating a campaign → setting up the ad folder → viewing analytics → sharing the report
How It Works #
The concept is simple: create a folder in your overlay, mark it as an "Ad Folder", and My Pie handles the rest.
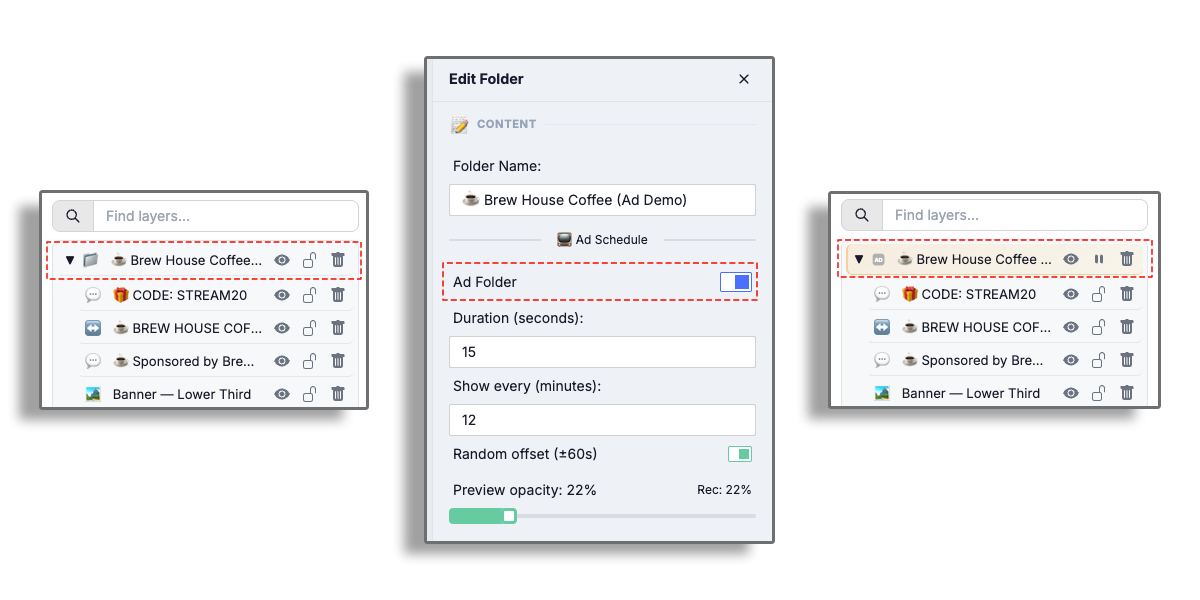
- Create an Ad Folder in the studio editor and place your sponsor's banner inside it.
- Set a schedule: how often the ad should appear and how long it stays on screen.
- Stream as usual. Every time the ad appears, My Pie logs an impression and pulls your live Twitch stats (viewers, category, stream title).
- Share the report with your sponsor. They get a dashboard with all the data, no login required.
Setting Up Your First Campaign #
Step 1: Create an Ad Folder #
- Open your Studio Editor
- Click + Folder in the top toolbar
- Select the new folder in the Layers panel
- In the Object Editor on the right, turn on the Ad Schedule toggle
- Give it a clear name, something like "BrandX Banner" so you can find it later
Step 2: Pick a Mode #
Once Ad Schedule is enabled, the first thing to choose is the Mode. Three options, each suited to a different sponsorship style:
Scheduled (timed slots)
The ad folder pops up at regular intervals and disappears after a set duration. Best for "20 seconds every 15 minutes" style placements. Two settings:
- Show every (minutes): how often the ad fires (e.g., 12 minutes).
- Duration (seconds): how long it stays visible per fire (e.g., 15 seconds).
- Random offset (±60s): optional jitter so consecutive fires aren't perfectly clockwork. On by default.
Always On (continuous)
The banner stays on screen for the entire stream. My Pie samples a verified impression every 5 minutes so the report captures viewer-count changes throughout the broadcast. Best for "title sponsor" placements where the brand is always visible.
Rotate (cycle through banners)
Cycle through multiple banners inside the same folder, one at a time. Best when you have several sponsors and want to give each a fair share of screen time. Settings:
- Show each for (seconds): how long every banner is visible per turn (e.g., 8s).
- Gap between banners (seconds): optional pause where nothing is shown between turns. Set to 0 for back-to-back rotation; bump to 30 or 60 if you want viewer breathing room.
- Intro / Outro animation: how each banner fades in and out as it swaps.
Hidden banners (eye toggle) are skipped automatically; the cycle continues from the next visible one. Hide a banner mid-stream to pause it without breaking the rotation.
Step 3: Add Your Sponsor's Content #
Place your sponsor's assets inside the Ad Folder: images, logos, animated WebMs, text overlays, or whatever else they need. Everything inside the folder will appear and disappear together based on the schedule.
Don't forget to Publish when you're done!
What Gets Tracked #
Every time the ad appears on your live stream, My Pie records:
- Timestamp: Exactly when the ad was shown
- Duration: How long it was visible
- Viewer count: How many people were watching at that moment
- Category: What you were streaming (e.g., "Valorant", "Just Chatting")
- Stream title: Your stream title at the time
All of this is pulled directly from the Twitch API in real time.
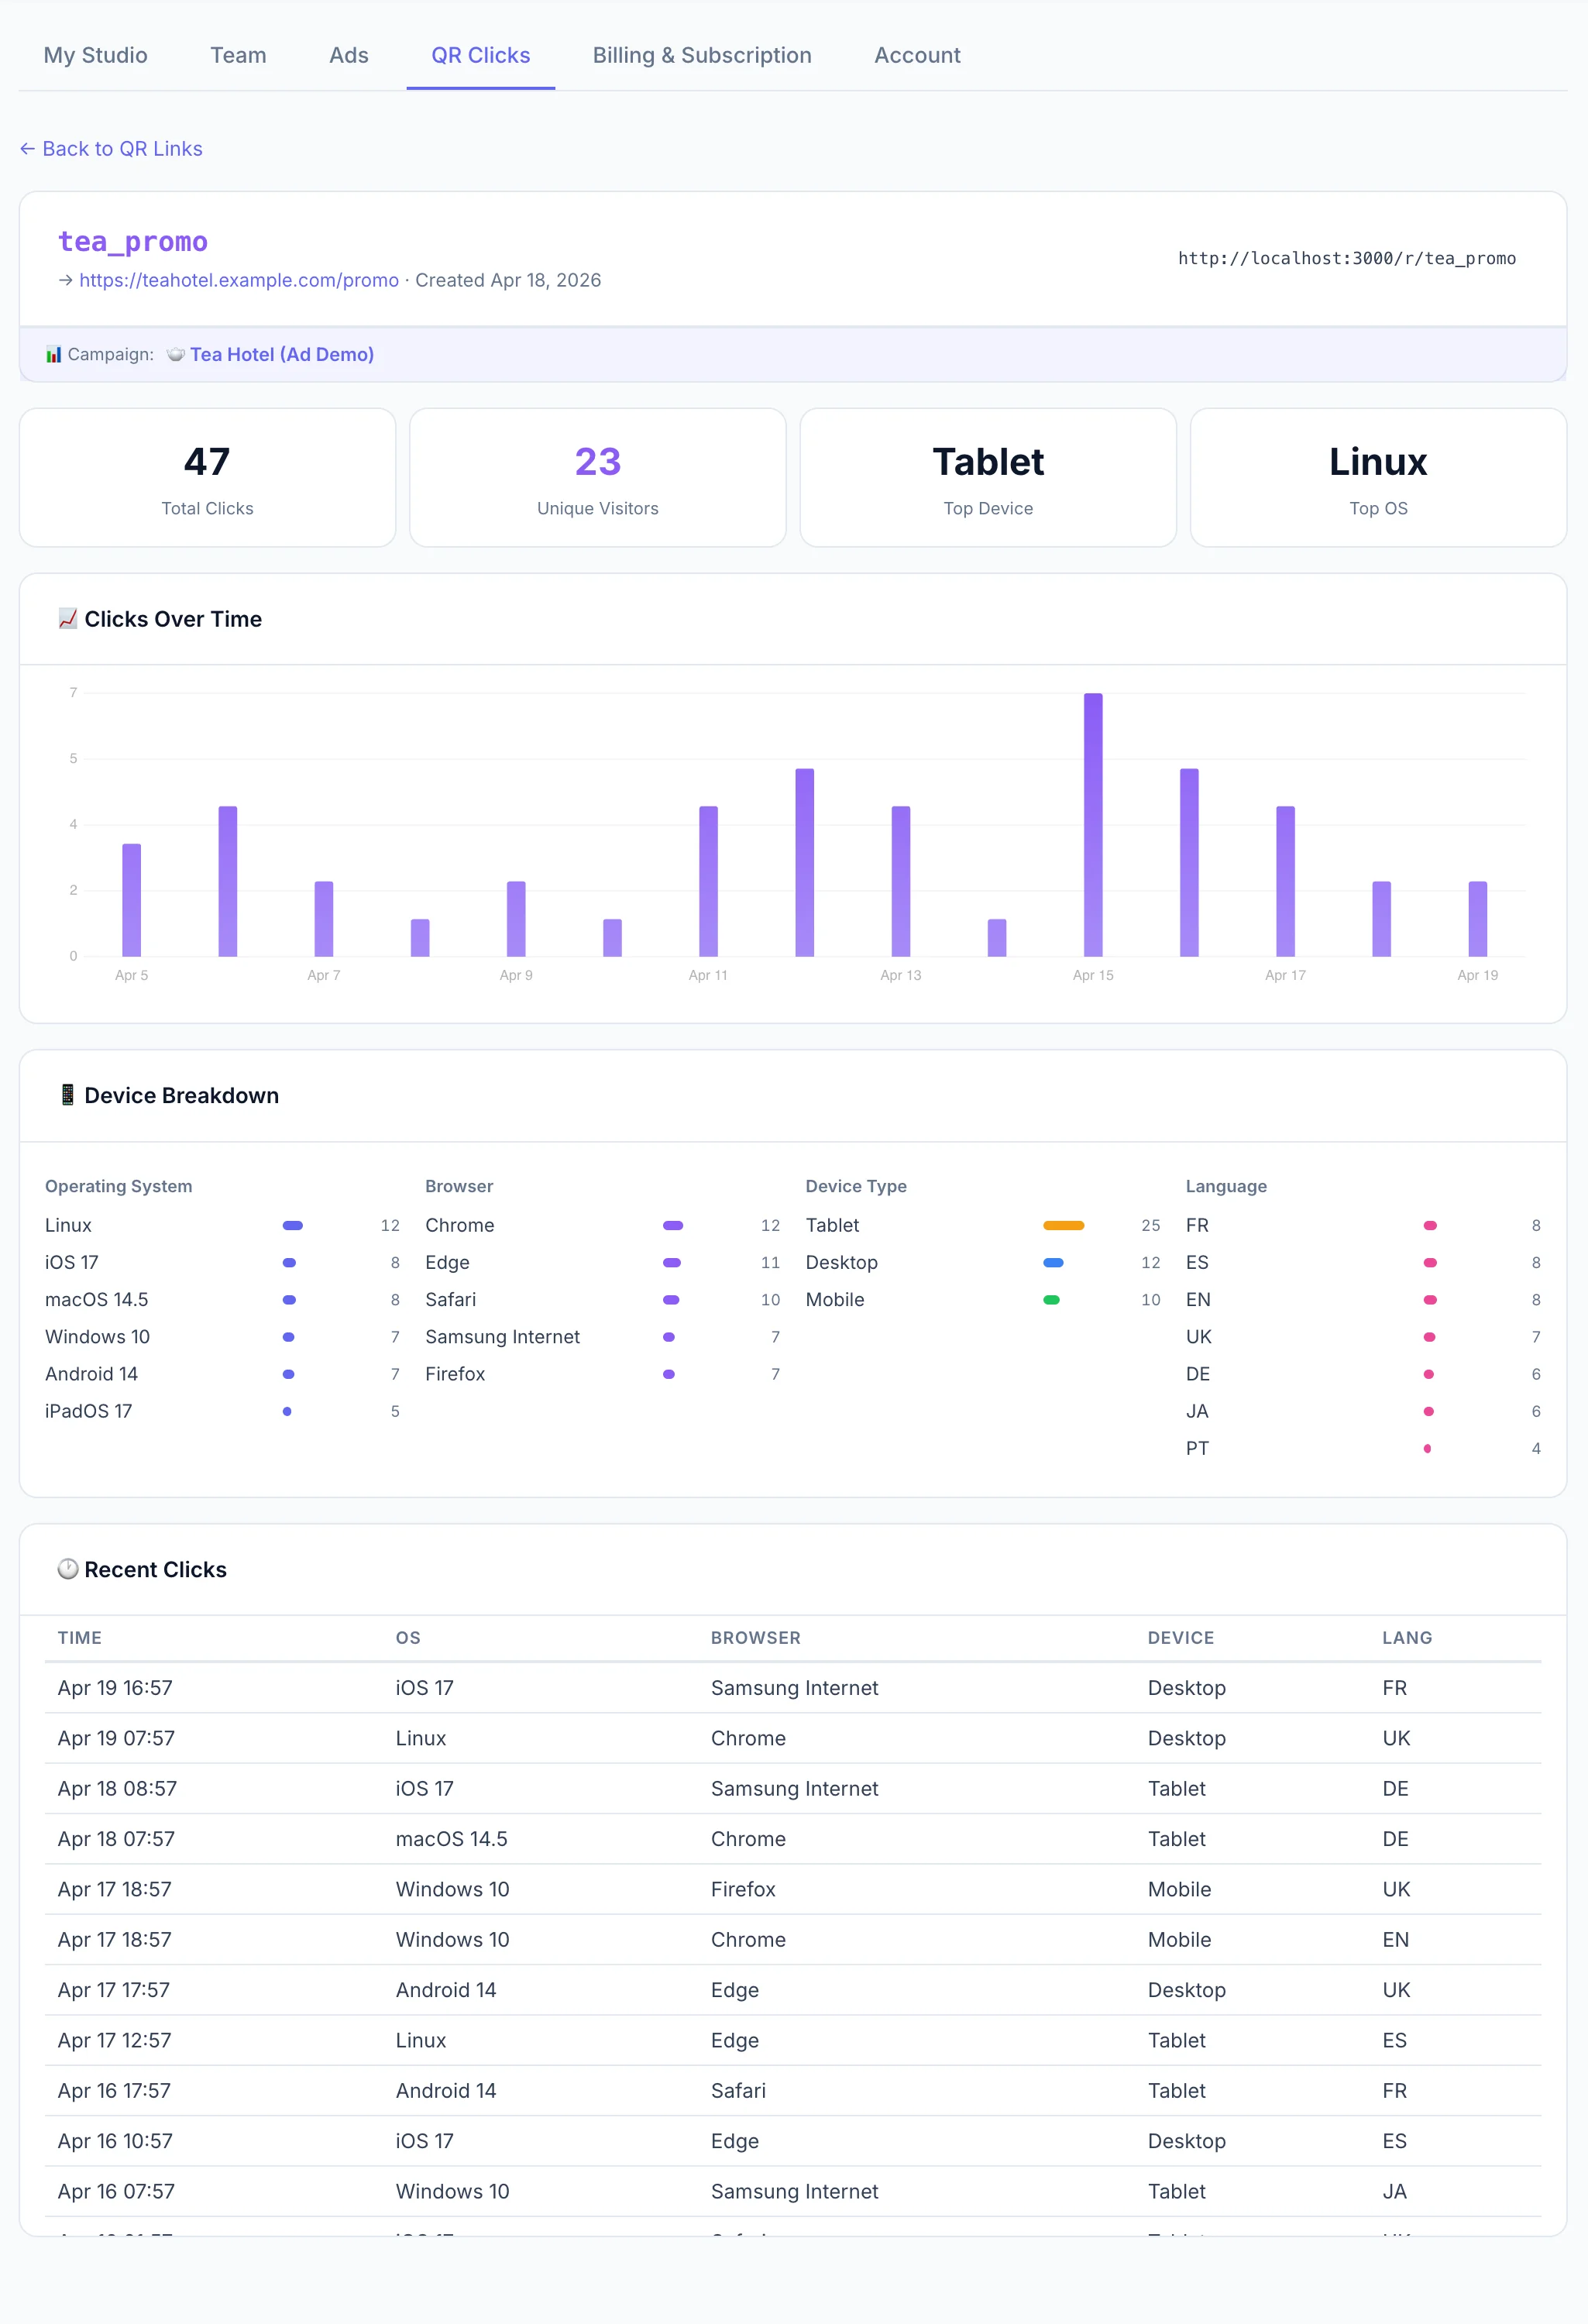
Click Tracking (QR Codes) #
Why it matters for sponsors: Impressions show how many times an ad was displayed, but QR codes show how many viewers actually took action. Instead of just saying "your banner was displayed 500 times," you can tell a sponsor "47 viewers scanned the code and visited your page." This makes your ad packages significantly more valuable.
To set it up, simply add a QR Code element inside your Ad Folder alongside your banner image. Enter the sponsor's URL, the system handles everything else automatically.

How it works
- Shortlink Generation: Every QR code gets a unique shortlink (e.g.,
mypie.studio/r/aB3x9Z) that redirects to your sponsor's URL. The QR code on screen always points to this shortlink. - Click Analytics: We track total and unique clicks, device type (mobile, tablet, desktop), operating system, browser, and approximate locale.
- Sponsor Report: All click data appears automatically in the public report alongside impressions. Sponsors see a complete picture: impressions, clicks, click-through rate, and device breakdown.
- Spam Protection: Clicks are rate-limited to 1 per IP per minute. We use privacy-preserving hashes, raw IP addresses are never stored.
Using QR codes without Ad Campaigns
You don't need a sponsor to use QR codes. Place a QR Code element anywhere in your overlay, outside of Ad Folders, to share any link with viewers: your merch store, Discord invite, donation page, or social media. Analytics still work the same way; you can see scan stats in the Dashboard → QR Clicks section.
How Impressions Are Counted #
Each ad impression is recorded the moment a banner becomes visible on the overlay, with a Twitch viewer-count snapshot for verification. Counting differs slightly by mode:
- Scheduled mode: When the folder fires, every visible banner inside is shown together. Each one counts as a separate impression with the same timestamp and viewer count.
- Rotate mode: One banner is on screen at a time. Each appearance of a banner is its own impression. A banner that cycles 12 times in a stream has 12 impressions for that stream.
- Always-on mode: The banner is continuously visible. Sample impressions are recorded every 5 minutes so the report captures viewer-count changes throughout the stream.
Network retries are de-duplicated server-side so the same display never counts twice.
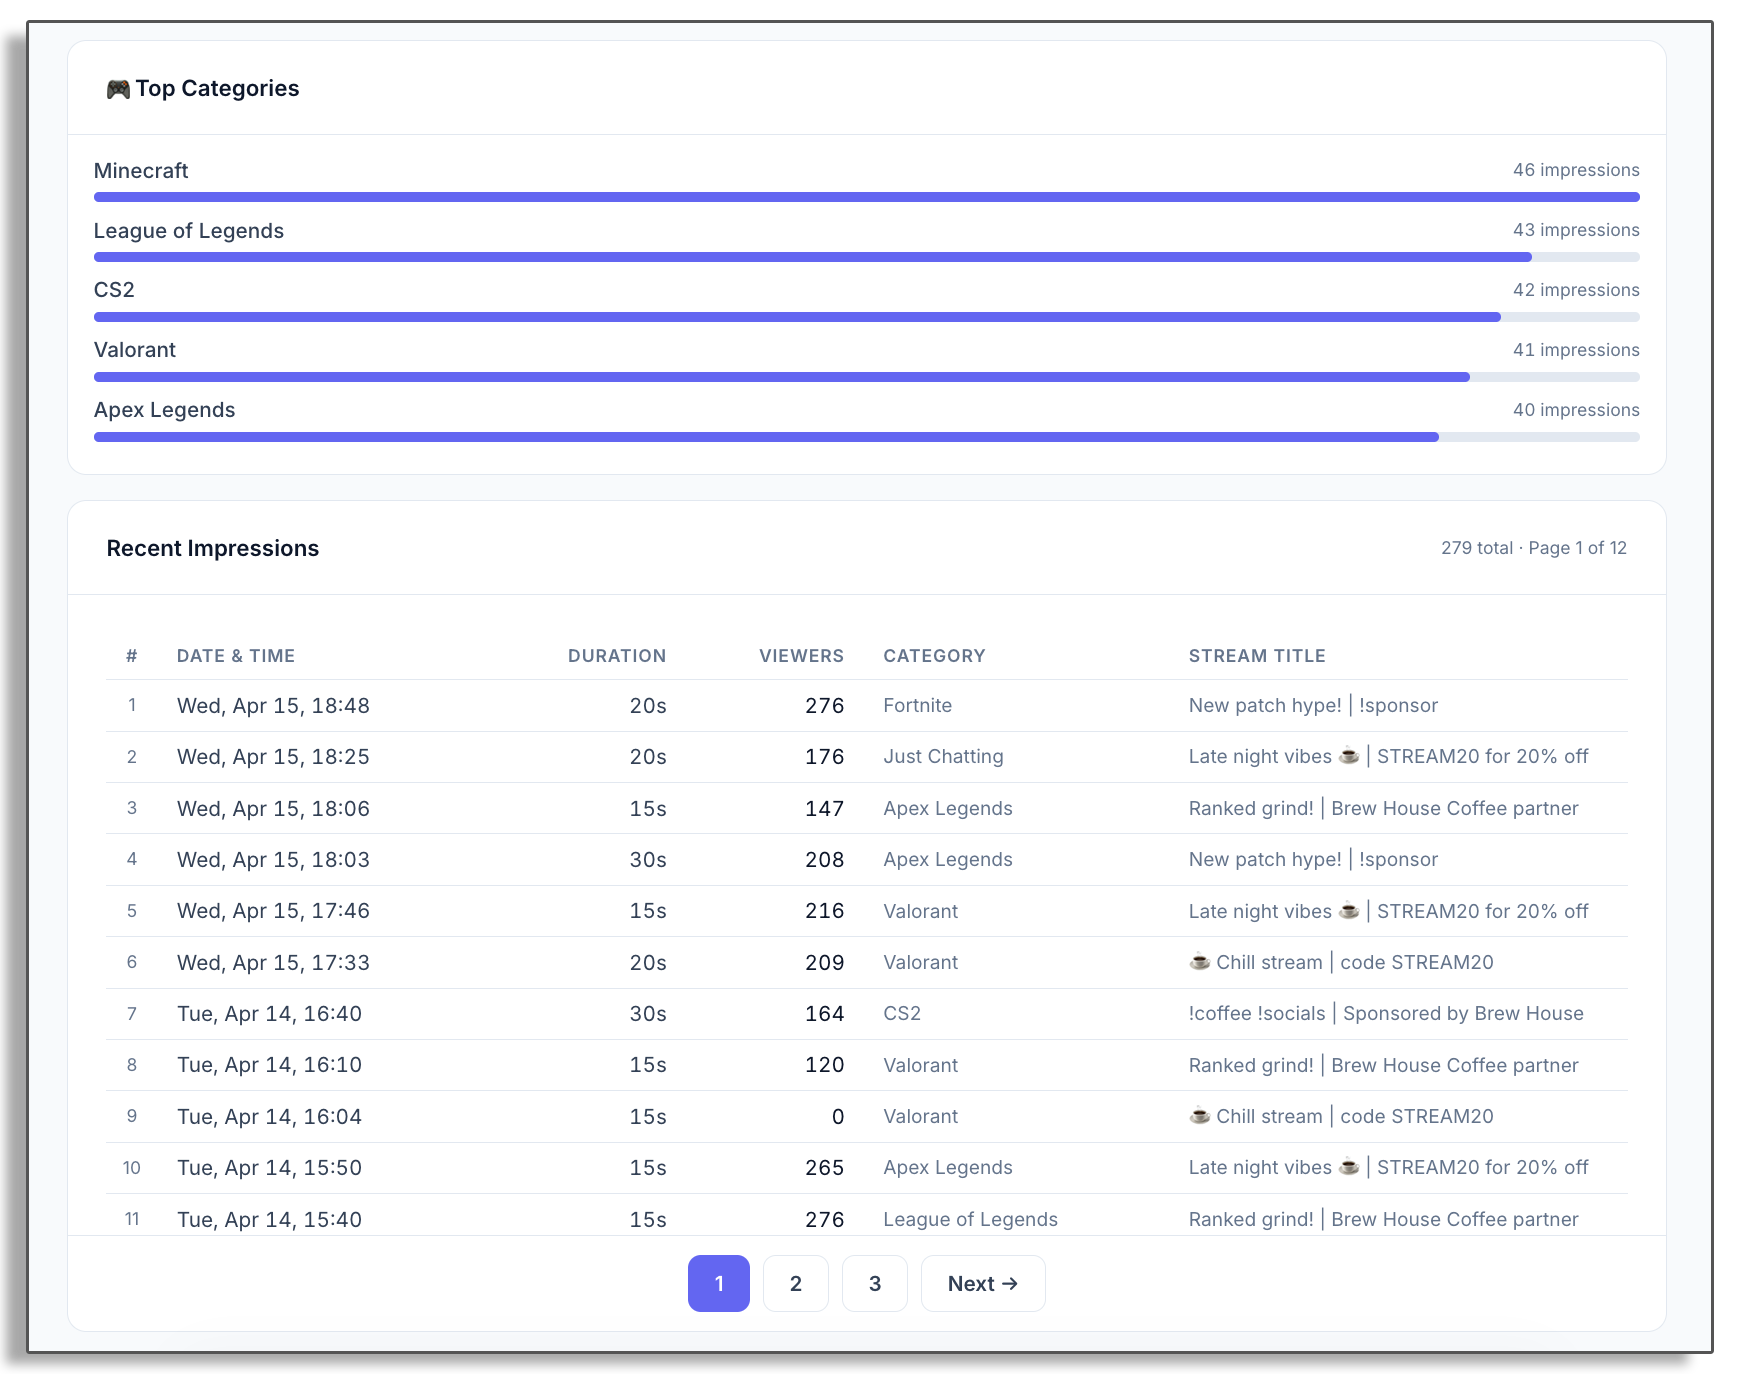
Viewing Your Analytics #
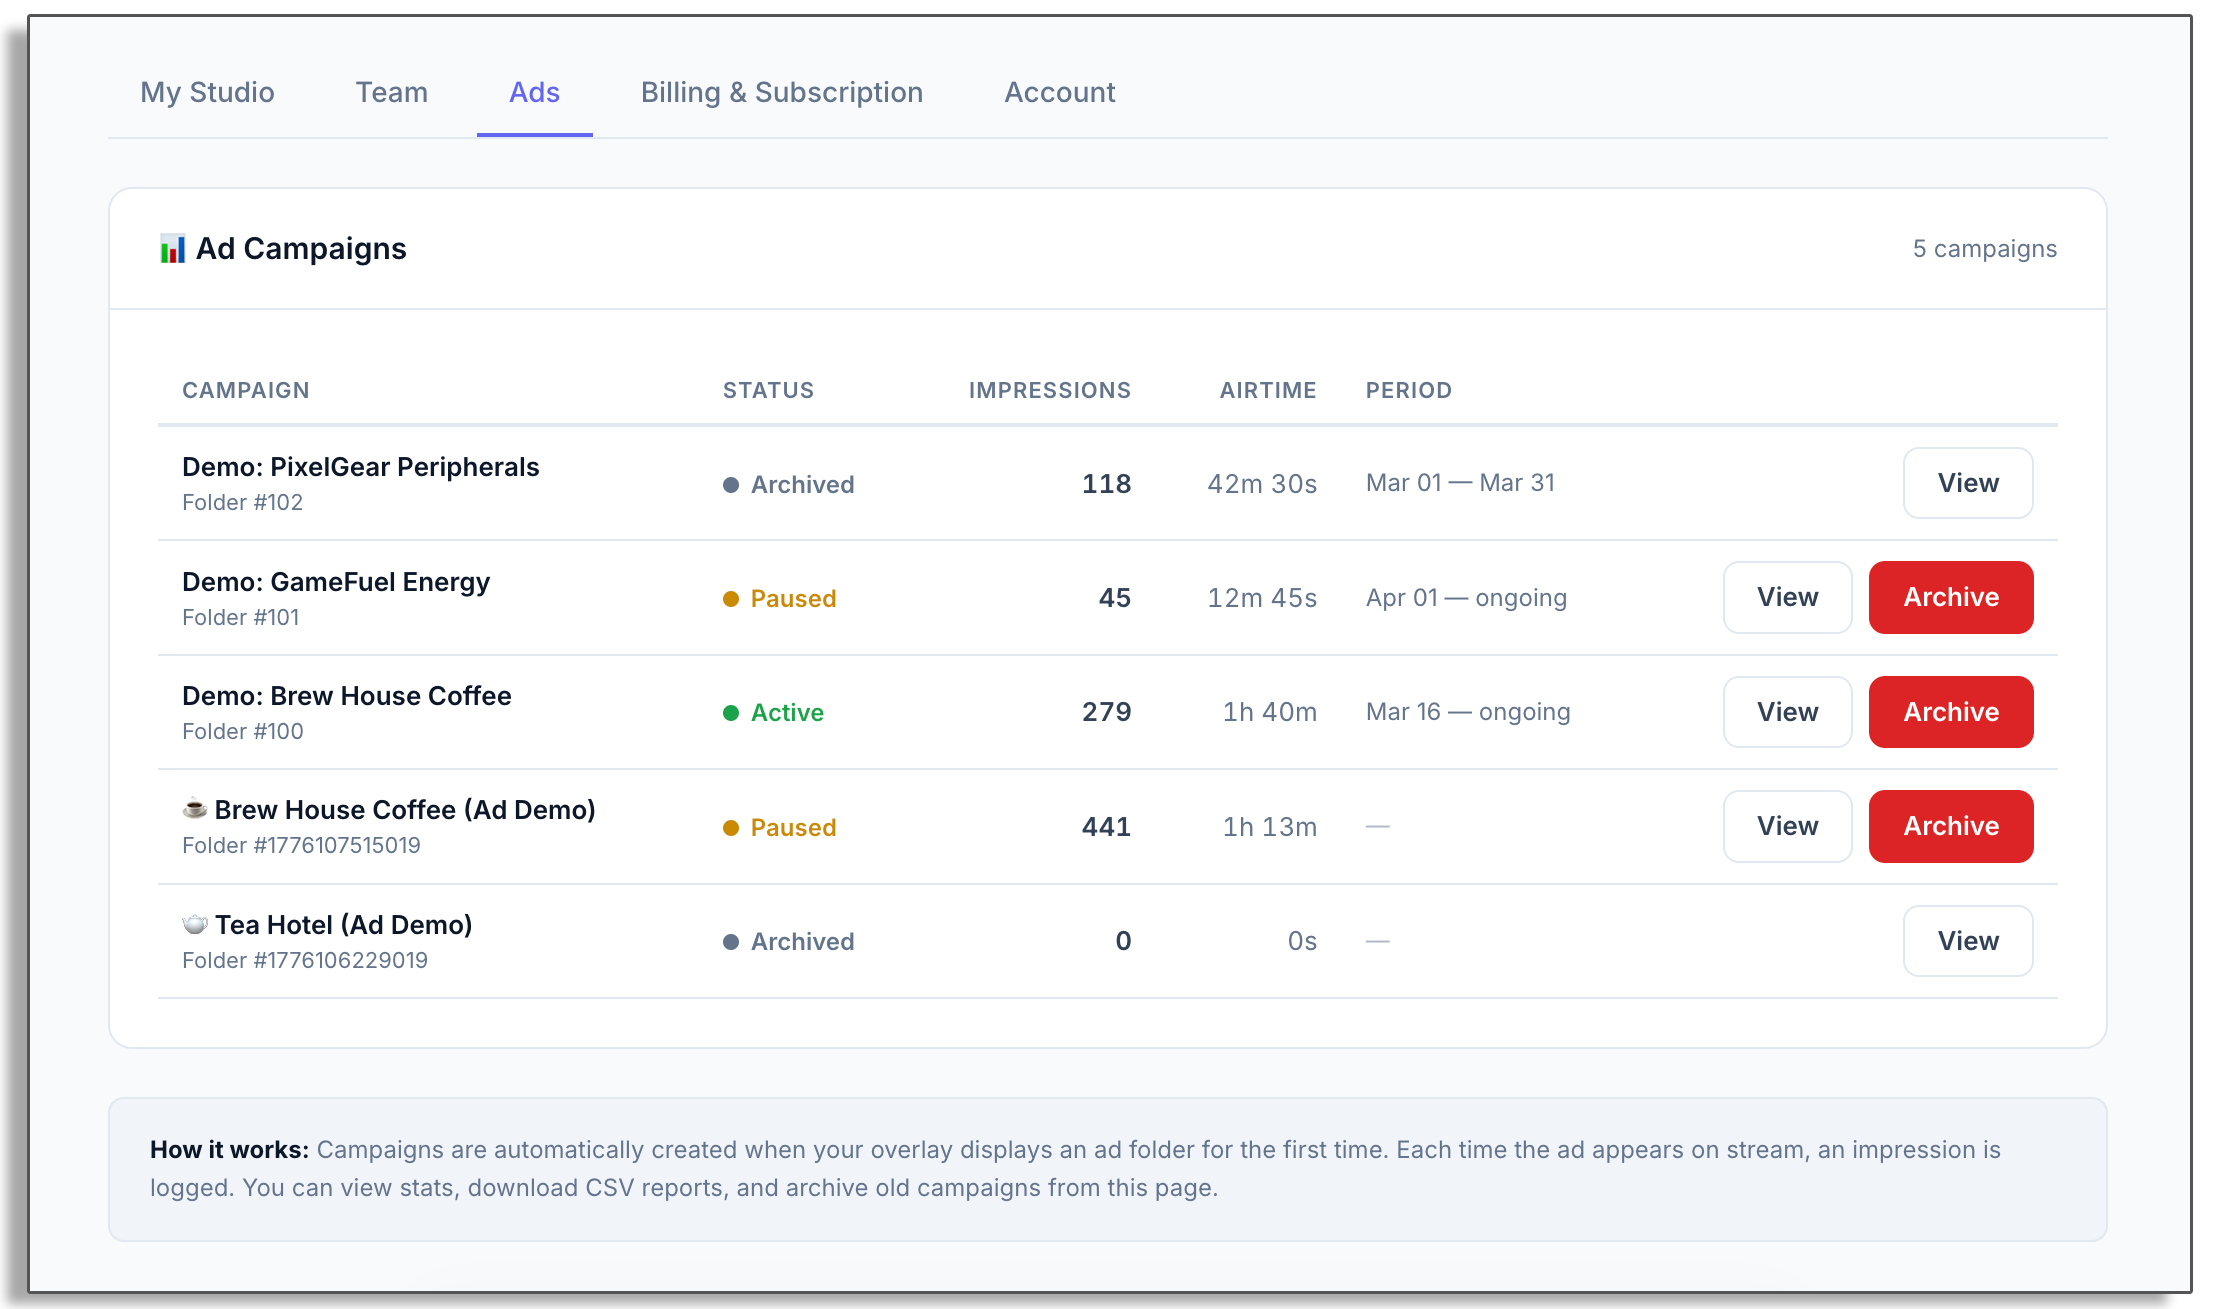
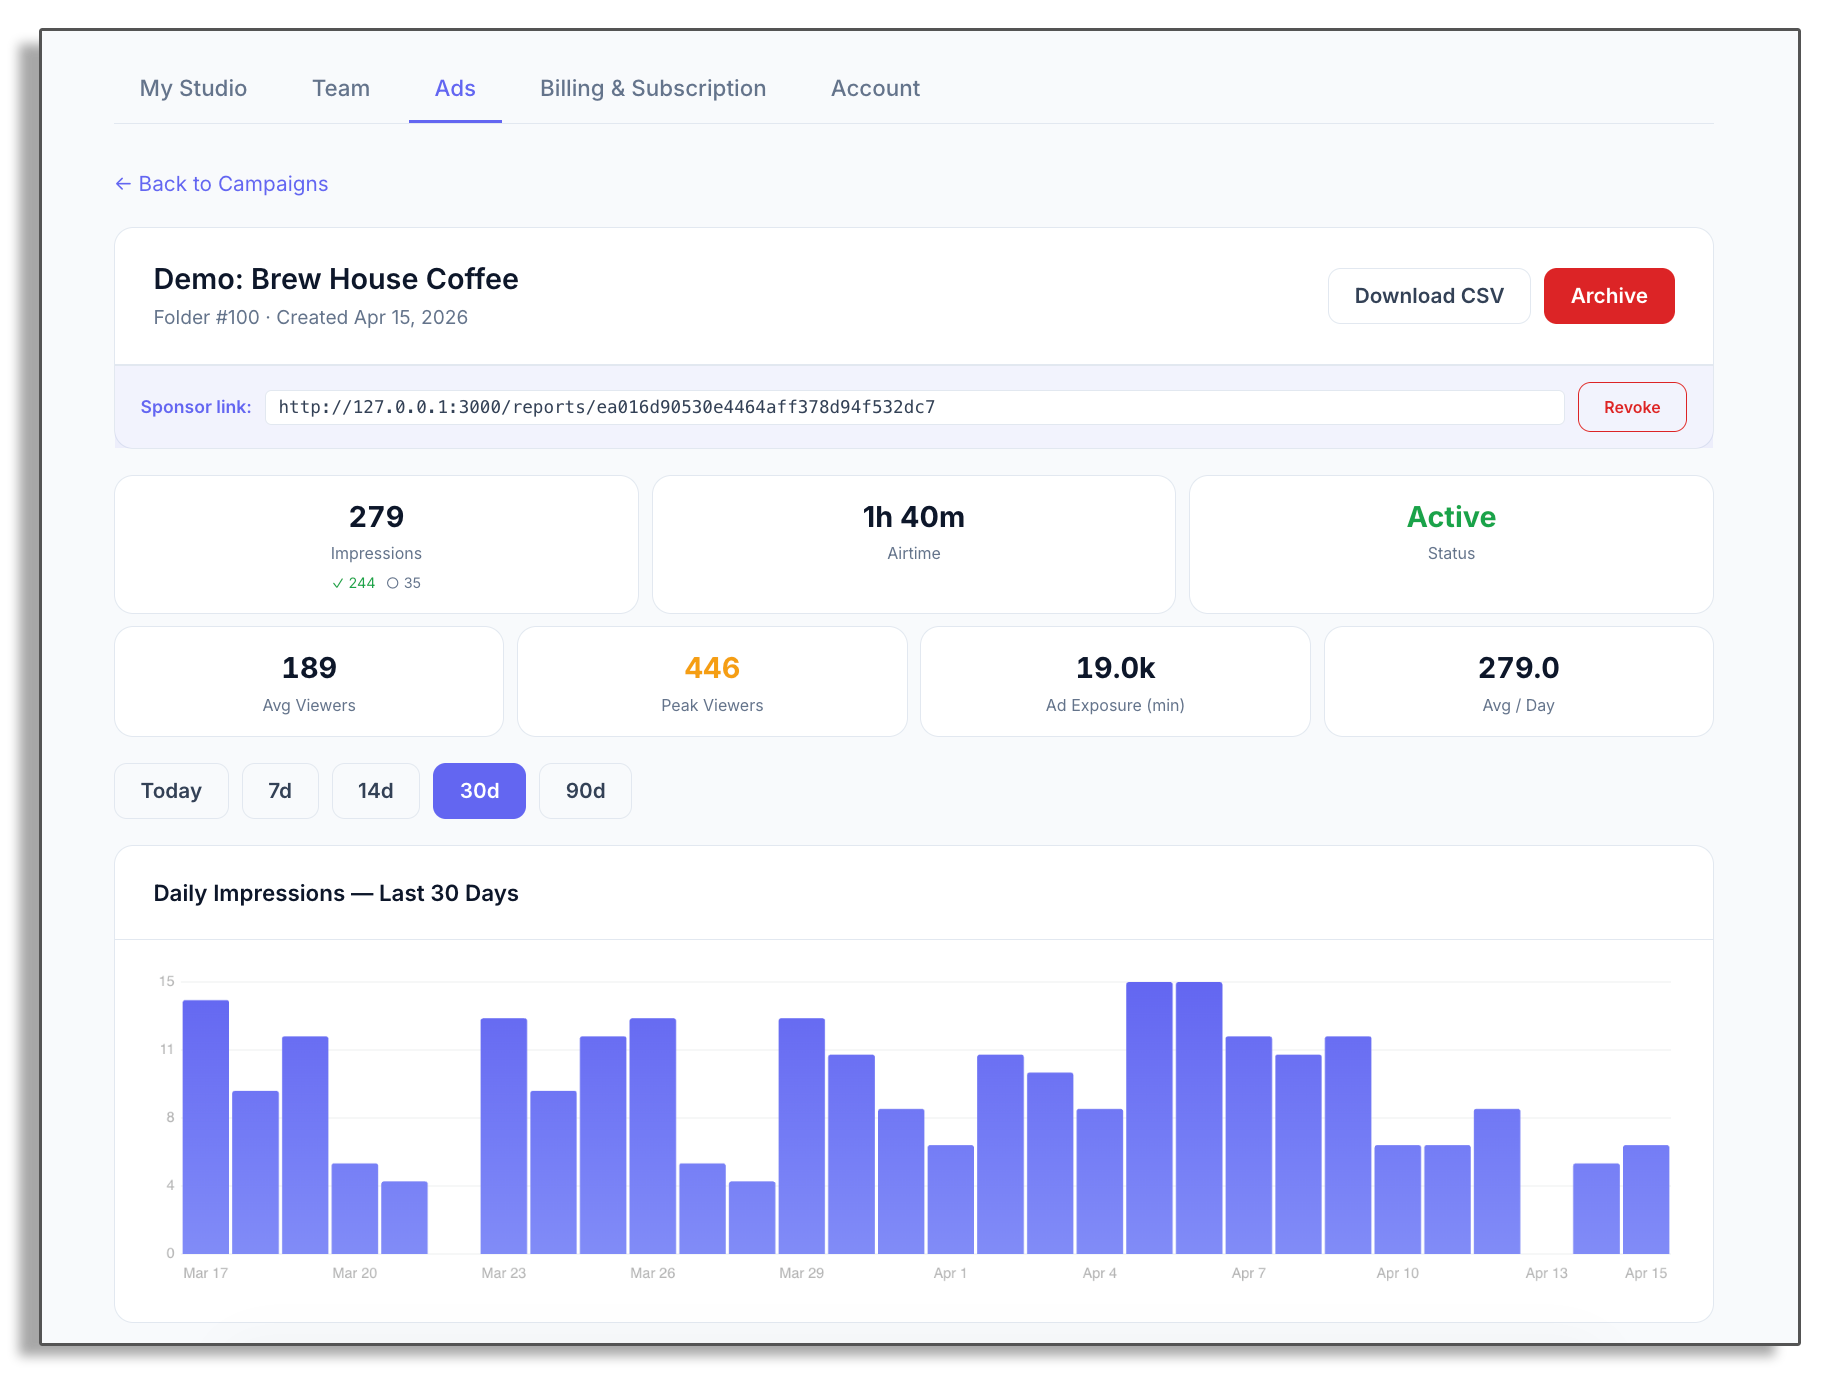
Head to Dashboard → Ads to see all your campaigns. Click into any campaign to get the full picture:
- Total impressions: How many times the ad was shown
- Airtime: Total time your ad was on screen
- Average & Peak Viewers: Viewer stats across all impressions
- Ad Exposure: Total reach in viewer-minutes
- Daily chart: Visual breakdown of impressions over time
- Impression log: Every ad impression with full details
If your campaign includes a QR code, you'll also see detailed scan data in Dashboard → QR Clicks or directly within the sponsor report. This includes:
- Total & Unique Clicks: How many times the link was opened
- Device Types: Desktop, mobile, or tablet breakdown
- Browsers & OS: What software your viewers are using
- Click Log: A timestamped history of every verified scan
Sharing Reports with Sponsors #
The Share Link #
Every campaign gets a unique public link you can send to your sponsor. They'll see a professional report page with:
- Key metrics at the top
- A daily impressions chart
- The full impression log
No login, no sign-up, just send the link and they're in.
Only verified impressions appear in the report. Each impression is confirmed by the Twitch API with a real viewer count. If Twitch can't confirm you were live, the impression won't appear in the report.
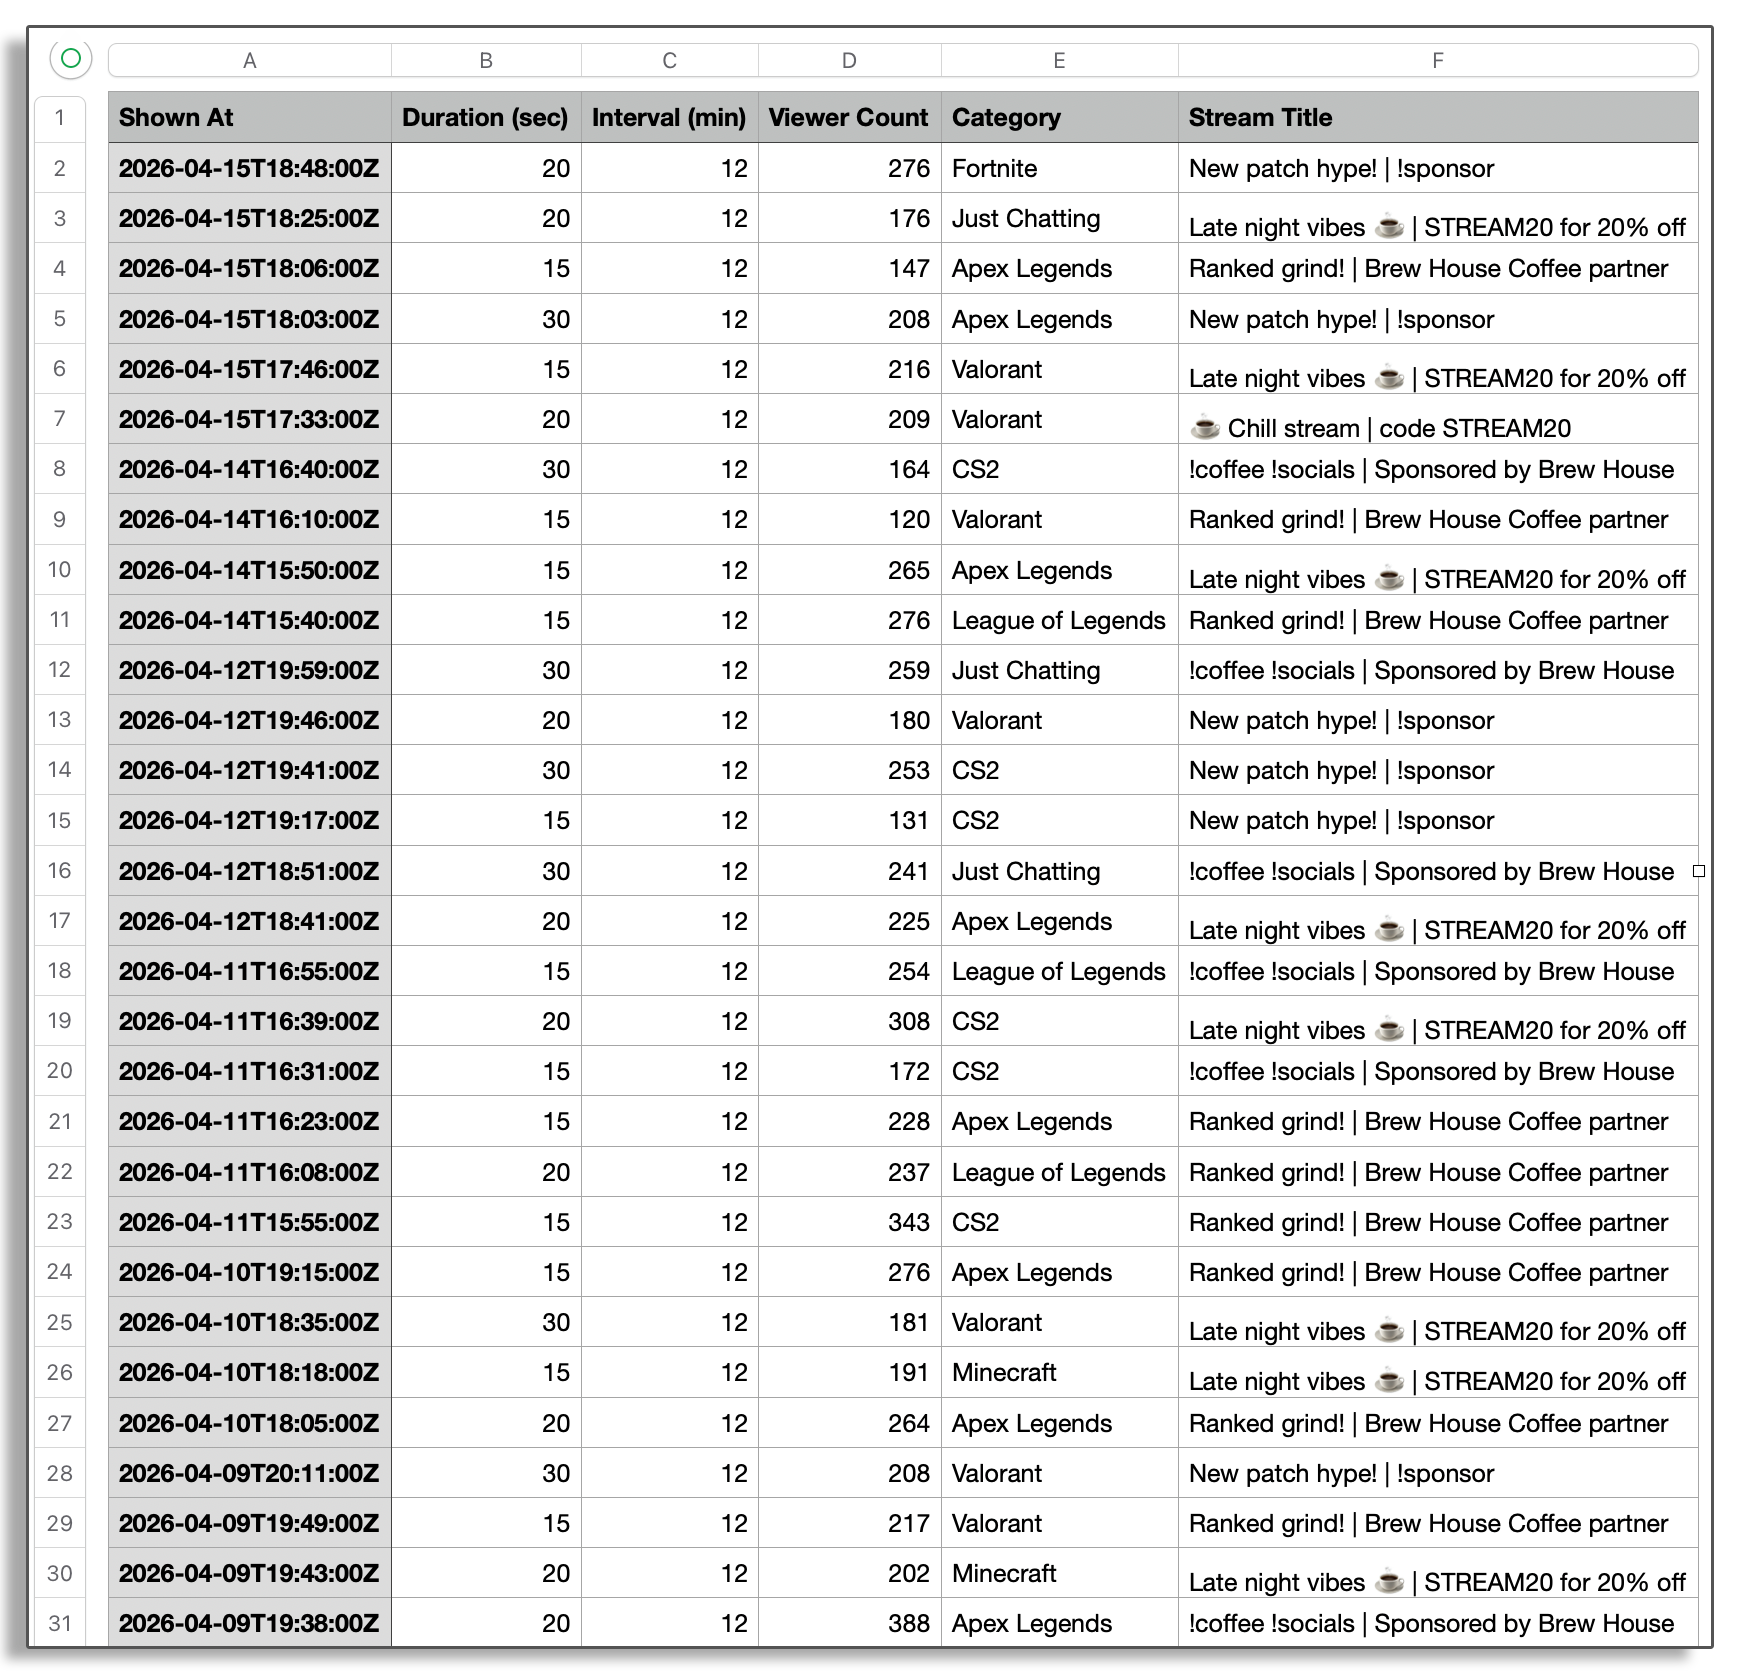
CSV Export #
Need the raw data? Download everything as a CSV file. Columns include: timestamp, day of week, mode (Scheduled / Always On / Rotate), duration, interval, viewer count, verified flag, category, stream title, shown creatives, and time-into-stream. Perfect for invoices, custom reports, or auditing.
The download button is on the campaign detail page. There's also a separate Clicks CSV when QR codes are involved.
Per-Sponsor Share Links (Multi-Sponsor Folders) #
If you rotate banners from different sponsors in the same Ad Folder, the campaign-level share link would expose all of them to whoever you send it to. To solve this, every banner inside an Ad Folder also gets its own private share URL.
How it works
- Open the campaign detail page (Dashboard → Ads → your campaign).
- Scroll to the Sponsors card. Each banner in the folder is listed with a thumbnail, an editable sponsor name, a unique share URL, and that sponsor's own impression stats.
- Fill in the sponsor name (e.g., "Bean Brew Coffee Co.") so it appears as the heading on the public report.
- Copy each sponsor's URL and email it to the right contact.
What sponsors see
When a sponsor opens their per-sponsor URL (/reports/sponsor/<token>), the report is filtered to only their banner's impressions. They see:
- Their banner thumbnail and sponsor name at the top, so they know it's their data, not someone else's.
- Total impressions, verified count, airtime, peak viewers, viewer-seconds, all filtered to their banner only.
- The recent impressions list and CSV download (also filtered).
- Nothing about the other sponsors in the same folder.
If a URL leaks
Click New link on that sponsor's row. A fresh token is minted; the old URL stops working immediately. Email the new URL to the sponsor.
Single-sponsor folders
If your Ad Folder only ever contains banners from one sponsor, the campaign-level share link works fine. Sending the campaign URL is the same as the per-sponsor URL because there's only one sponsor in the data. The Sponsors card still shows that one sponsor, with their own URL if you'd rather use it.
Common Questions #
Can the data be faked?
No. Impressions are sent from your live overlay to My Pie's server, which independently verifies your stream status via the Twitch API. If you're not live, nothing gets recorded. Viewer count and category come straight from Twitch.
Can I run multiple campaigns at once?
Yes. Each Ad Folder becomes its own campaign with separate analytics and its own share link. Run as many as you want.
Does the ad need to cover the whole screen?
No. You can make the ad folder any size, a small logo in the corner, a banner at the bottom, or a full-screen takeover. Position and size it however you want in the studio editor.
What if I want to pause a campaign?
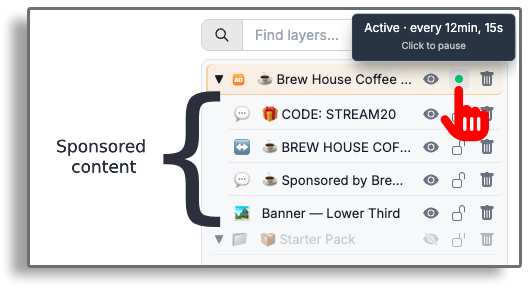
The schedule badge on the Ad Folder in your layers panel works the same in every mode (Scheduled, Always On, Rotate): green dot = running, click to pause, click again to start. You can also hide the folder via the eye icon. Hiding always pauses; unhiding does not auto-resume, you start it explicitly with the badge. To stop tracking entirely and remove the campaign from the active list, archive it from the dashboard.